A little friendly advice for these cold winter nights from the Martin Brothers:
Thursday, January 28, 2010
Martin Brothers pot from Philly
Friday, January 22, 2010
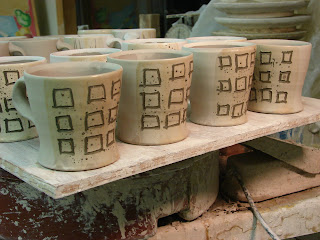
Vases and mugs
This is the flashing slip recipe:
40 t-6
40 om4
10 neph sye
10 whiting
A nice batch of these medium sized mugs. Carving, flashing and titanium slip, with wax resist and Suzies black. Mark Shapiro showed this technique a couple of years ago during a Penland summer workshop.
Labels:
coffee mug,
flower vase,
floydpots,
josh floyd,
mark shapiro,
suze lindsay
Monday, January 18, 2010
Moving right along...
This bottle was fired with my friend Scott Cornish, in his 2 chambered train/bourry box/cantenary arch wood/soda kiln west of Slippery Rock near New Galilea, PA.

flask form.
Bisqued bottles await firing. Wood, Gas Salt or Reduction. So many choices.
I have been returning to a couple of successful forms. This time last year I was in the same space and things feel familiar. This time of year I end up making pots that relate to what's happening, like beer tankards, whiskey bottles, jugs, big soup bowls and bread plates. Aint much to do round here when the weather turns sour, except eat, drink and make pots...I think I'll stay.
The white slip on the bowl forms are a version of
Val Cushings S O T:
30 Grolleg
20 XX Sagger (the original called for EPK)
20 T-6
30 Custer
I wanted to see what ball clay would do to this slip. I've used it in/on all kinds of pots and firings. Though it tends to peal away from pots when you brush it on a leather hard pot, I have had success with dipping and pouring it on leather hard or brushing/wiping it on wet pots on the wheel. It has worked quite well on plates with shell flashing. The substitution of ball clay in the recipe may affect the flashing affects. The flashing comes from the high alumina content of the 70 percent kaolin slip(and the atmosphere of the kiln), but I'm thinking the changes will be minimal. I'm hoping the ball clay will aid in leather hard application. Time will tell, as we'll be firing soon. I've been using SOT on half of the work, including some pots I'll fire with a celadon or tenomoku glaze in reduction. The slip will fire white under a clear or glossy glaze.
The flasks(5 of the 12 I made) have been bisqued and are ready for a fire. They were made with a light firing stoneware and then dipped in a slip made from Laguna's B-mix for cone 10. My friend Donn uses B-mix, and orders it dry in 50 lb bags, so I'm trying it as a slip. All in due time.
I will most likely gas/salt fire this work here in Smicksburg. I hope to keep a few for other firings, as I've posted before.
Well, that's enough for now, I hope. Stay warm!
Thursday, December 17, 2009
Jugs
Here are a few new pots in process. I've been working in the downstairs studio of Donn Hedmans pottery near Smicksburg. Donn has graciously offered me space in his super nice studio with a beautiful view. I'm making plenty and bisquing work for future firings. Out at Brush Valley, I don't bisque, so I thought I would store away a few dozen pieces that I can take to other folks firings in the coming months.
As for this recent work, I've been trying to hold back on my urges to use the colored slips and linear decoration that I usually include in my work. I struggle to not over decorate forms such as these jugs. The shapes, hopefully, will stand alone.
I have return to this form over and over through the years. I have always been intereste in historic jugs and the change in their shapes that trace the development of the industrialization of clay manufacturing. The closer you get to the 1900's, the flatter and straighter the jug shapes become. The more graceful forms of previous centuries leave wasted space in a kiln where the bellies meet and can be difficult forms to make. The early American jug shapes reference their German and English counterparts, with full bellies, long graceful necks and and a narrow foot.
I am also searching for relevance in these forms in today's day and age. How do these jugs fit in to contemporary life? Well, maybe they don't and maybe that's EXACTLY why we need them. These simple containers echo a time of simplicity. Not necessarily an easier life, just different and simpler. I hope I'm not stuck in the past but I think those folks made some nice jugs.
Wishing everyone Happy Holidays over the coming months...
Labels:
Donn Hedman,
floydpots,
josh floyd,
jugs,
Smicksburg
Thursday, November 12, 2009
Monday, October 19, 2009
Tuesday, October 13, 2009
Post-firing Firing post...
It has been a few days since my last post so this one is going to be a long one...all about the salt firing I just finished monday morning at 3 a.m.! This was the 6th time I've fired the kiln here in Brush Valley and the 3rd time for mostly rawglazed pots. For some of you who aren't potters, this means that I glaze the work when it is leather hard, using slip glazes that have a large amount of clay in the batch recipes. The clay in the glaze allows the glaze to shrink with the pot as water evaporates during the drying process. It can be tricky and most people choose to bisque fire their work and then glaze, but out of necessity, with no electric/bisque kiln here in Brush Valley, and the fact that most of my work only needs a liner glaze, I use this process of once firing. Once the pots are dry, it's time to load and fire.

I hope to post pics of the finished results soon! Dont forget about the potters tour! Can't wait to see you all here!
and pitchers.
The firebox extension worked out great
for preheating the greenware/rawglazed pots.
I loaded it up with large cherry and oak chunks,
clammed it up and went to bed around
4am. At 8 am I returned to find
coals still in the box and started the firing...
Without a Pyrometer to gauge the early
part of the drying process
I used this chimney
thermometer for a wood stove.
I need it for the beginning of the firing
to make sure nothng blows up at the point
where the water left in the pots
starts to "boil" or evaporate...
Toward the end of the firing we used the flame
to stoke off of and had a nice,
even firing of cone ten down.
Heres a picture of the kiln shed and flame coming
from the chimney. As soon as the flame went in, I
stoked again, and the flame lasted abut 1 1/2 minutes per
stoke. This temperature(nearly 2400 degrees) really ate up the wood!
I hope to post pics of the finished results soon! Dont forget about the potters tour! Can't wait to see you all here!
Subscribe to:
Posts (Atom)